

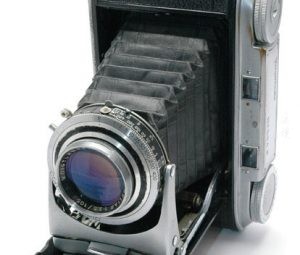
这是来自西班牙巴塞罗那的摄影爱好者Alfonso的一段艰苦的维修记录,包括了维修的过程和与毒镜的邮件沟通记录,最终Alfonso完美的修好了对焦故障的Bessa rf相机并且拍出了完美的照片,我们这里把寻找问题和维修的记录整理发布出来,方便遇到同样问题的朋友可以用来参考,这里同时保留英文版用于参考。
先看一下维修之前和之后的照片。
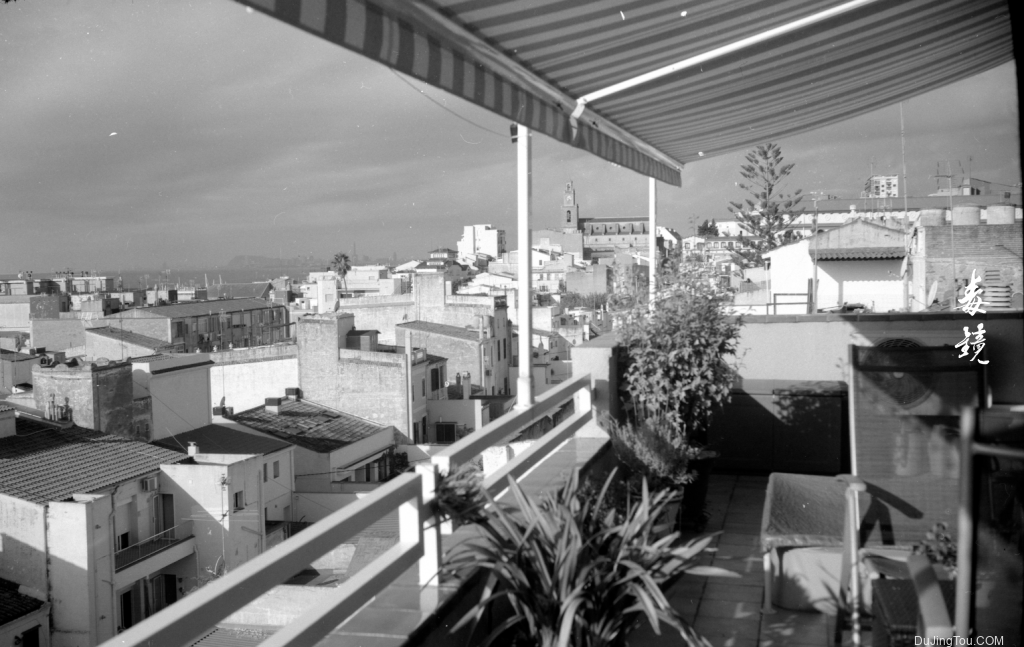
BESSA RF维修之后的样片,可以看到对无穷远对焦,远处清晰
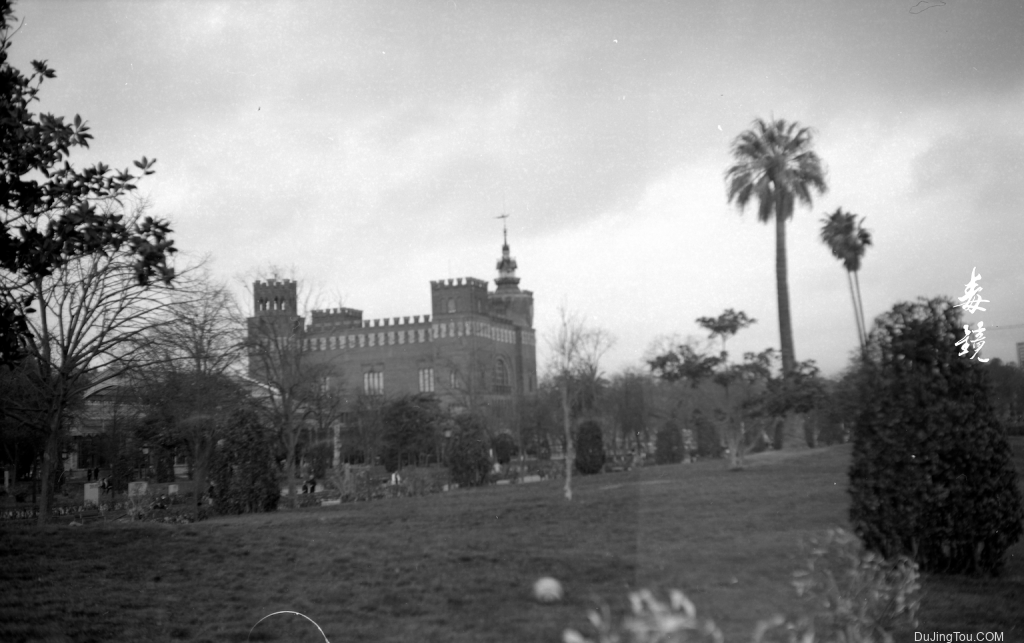
上一张图片的100%截图,可以看到锐度很好
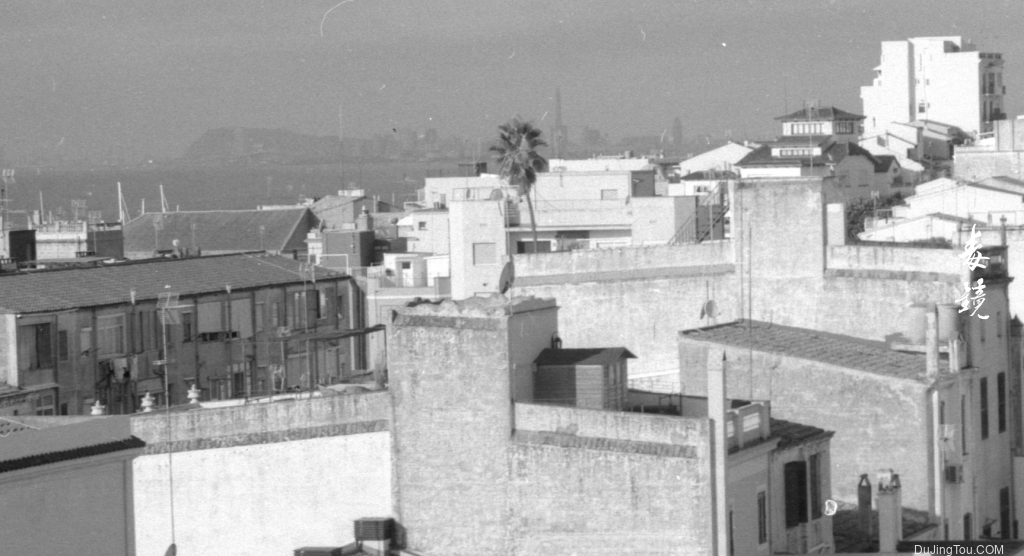
这张图片是维修之前的照片,可以看到远处景物不清楚,同时还有一点光轴不正。
在今年的五月我们收到了Alfonso的邮件,在按照之前的文章《voigtlander Bessa RF 黄斑不准维修,黄斑校准》调整维修Bessa rf的时候遇到了问题
This is a hard repair documented by Alfonso, a photography enthusiast from Barcelona, Spain, including the repair process and email communication with me.
Finally, Alfonso perfectly repaired the focus failure of the Voigtländer Bessar RF and took perfect photos, Here we explain the problem and log all the messages exchanged, so that friends who encounter the same problem can find some reference information. The English version is also kept here for reference.
Comparison of photos before and after repairs.
The sample after BESSA RF repair, you can see the focus on infinity, the distance is clear
100% screenshot of the previous image, you can see the sharpness is good
This picture is a photo before maintenance. It can be seen that the distant scene is not clear, and there is also a little optical axis that is not correct.
In May of this year, we received an email from Alfonso, who encountered a problem while repairing the Bessa RF according to theinformation from a previous article in this web.
问题:
我正在尝试调整 voigtlander Bessa RF 的测距仪,我发现了你的有趣文章。 我已经检查了当顶部焦点顶部轮子处于无限远和 1 米时相机对焦是否正确。 我可以在无限远时调整测距仪,但是当我尝试在 1 米处对焦时,它就失焦了。 如果我在 1 米处调整,则无限远失焦。 你能告诉我调整无限和1米的最佳程序吗? 您显示有两个螺钉可以水平调整测距仪(一个是箭头 2,另一个是左箭头)。 左箭头上的螺丝是什么用途? 您还说,在螺钉 2 的顶部,您可以垂直调整镜子。 最后一次调整的效果是什么?
QUESTION:
I am trying to adjust the rangefinder of a Vöigtlander Bessa RF and I have found your interesting article. I have checked that the camera focus correctly when the top focus top wheel is at infinite and at 1 meter. I am able to adjust the rangefinder when it is at infinite but when I try to focus at 1 meter it is out of focus. If I adjust at 1 meter then the infinite is out of focus. Can you tell me the best procedure to have both infinite and 1 meter adjusted? You shows there are two screws to adjust horizontally the rangefinder (one is arrow 2 and the other is on the left arrow). Which is the purpose the screw on the left arrow? You also say that on top of screw 2 you can adjust the mirror vertically. Which is the effect of this last adjustment?
解决建议
1.在焦点无限远的位置上,上下左右调整黄斑焦点准确。
2. 每次调整都要从黄斑窗观察。 你需要注意固定相机以及调焦位置。
3.不要让对焦齿轮脱落(否则会很费力)ps:这个问题 其实基本都会遇到
4、无限远位置调整完成后,即可安装。 最后,使深无限位置与聚焦无限一致,即拉到最近的位置时候 景深指示也是最近的。
5、如果要测试黄斑是否准确,可以无限远打开后盖,用磨砂玻璃(或半透明塑料膜)贴在贴膜位置,用放大镜观察。
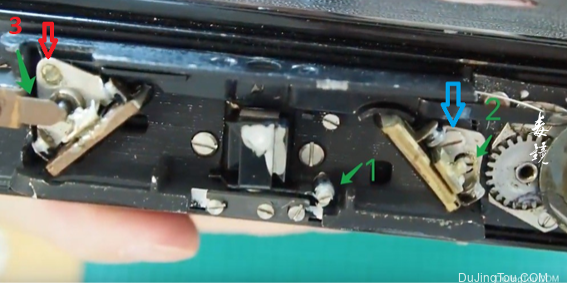
https://www.dujintou.com/wp-content/uploads/2019/12/bessa-rf-repair-9.jpg?v=1576823672
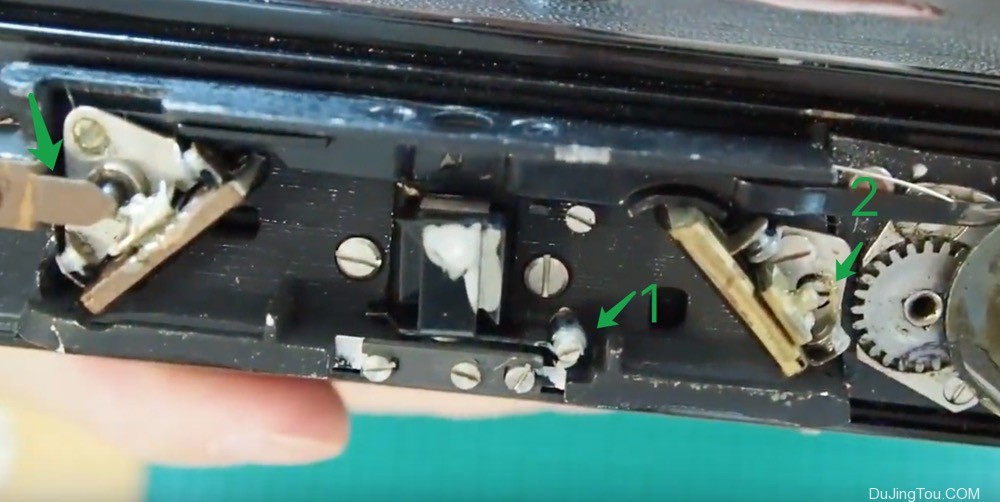
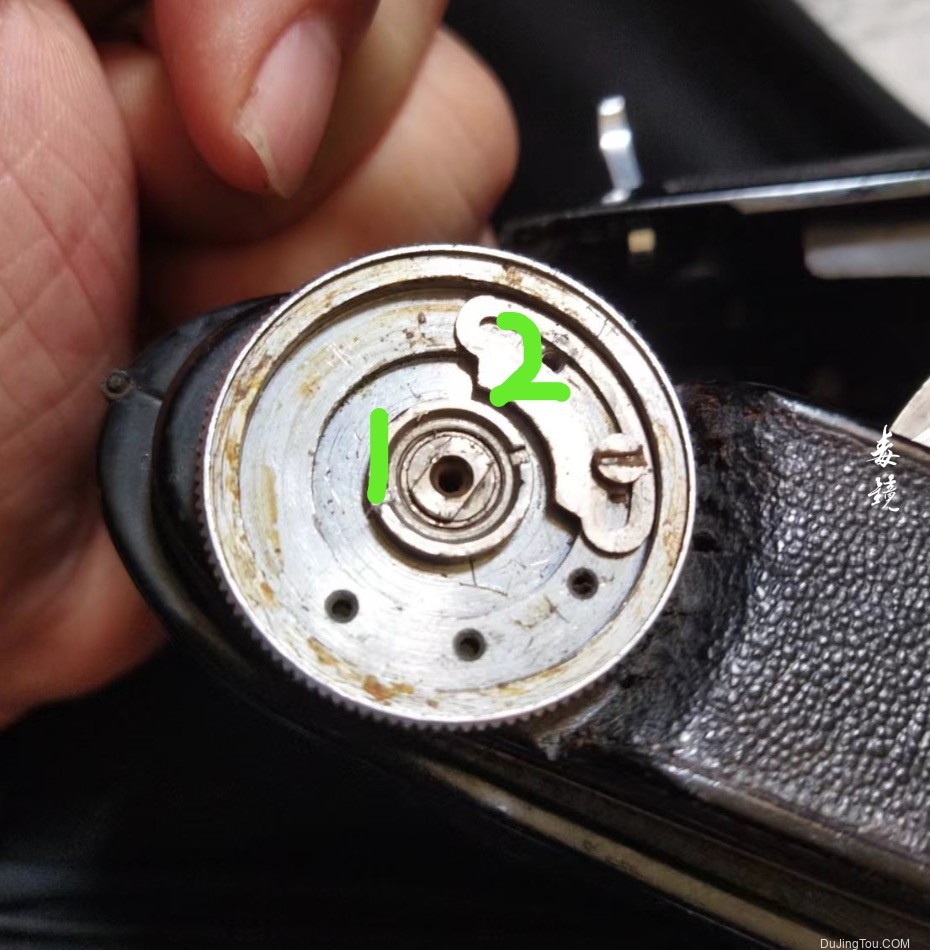
位置1是调整上下黄斑,位置2是调整左右黄斑。 同样,在左箭头处也有一个类似的螺钉。 2上面有一个螺丝可以调节反光板的垂直角度。
Solution suggestion:
- Move the focus wheel at the infinite position and look a faraway object. Adjust the rangefinder image to be accurate up, down, left and right
- Each adjustment should be observed from the rangefinder window. You need to pay attention to fix the rangefinder as well as focus position.
- Don’t let the focus gear fall off (otherwise you will have to start again)
- After the infinity position adjustment is completed, you can mount everything again.
- To check if the rangefinder is accurate, you can open the back cover, set the focus to infinity and place a frosted glass (or translucent plastic film) where the photographic film should be and observe if the projected image is in focus using a magnifying glass.
https://www.dujingtou.com/wp-content/uploads/2019/12/bessa-rf-repair-9.jpg?v=1576823672
Position 1 is to adjust the upper and lower rangefinder image, and position 2 is to adjust the left and right. Similarly, there is a similar screw at the left arrow. There is a screw above 2 to adjust the vertical angle of the reflector.
修理完毕后来自ALFONSO的建议
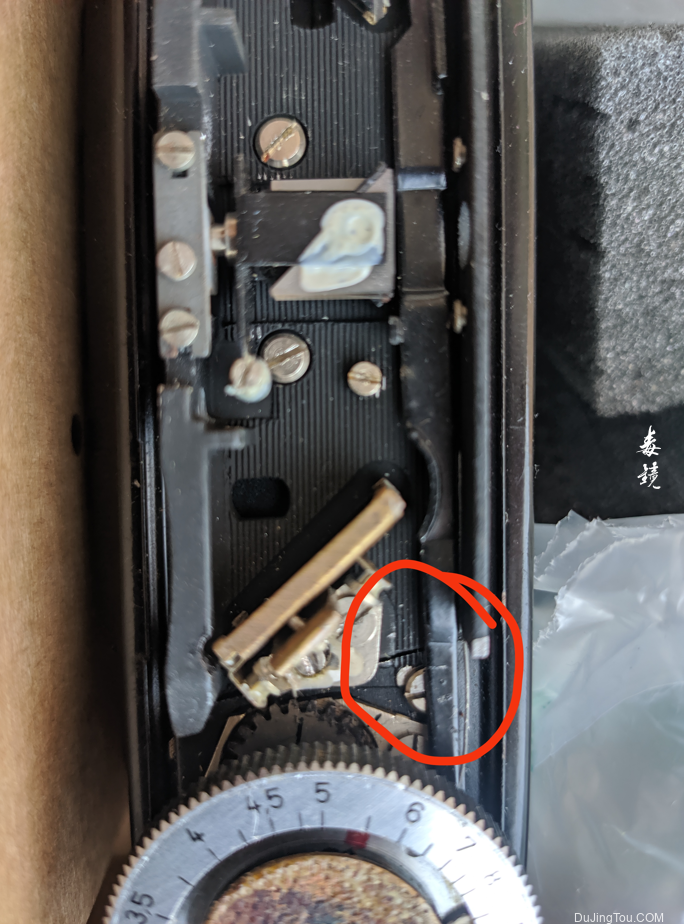
我发现调整活动镜(我用红色数字3标记)比调整固定镜(你用数字2标记)要容易。
至少在我的情况下,为了移动2号,我不得不松开我用蓝色箭头标记的螺丝。然后,我不得不再次拧紧它,在这样做的过程中,我移动了一点镜子,再次错位。
对于3号(红色),这种情况没有发生。
也许2号镜子允许初始调整,而3号镜子是用来做更精细的调整。
COMMENT FROM ALFONSO AFTER FINISIHING THE REPAIR
I found it easier to adjust the movable mirror (which I marked with the number 3 in red) than the fixed mirror which you marked with number 2.
At least in my case, in order to move number 2 I had to loosen the screw that I have marked with a blue arrow.I had to tighten it again when I finish and, in doing so, I moved the mirror a little bit and misaligned it again.
Adjusting with the screew marked with 3 (red) this did not happen.
Perhaps the mirror 2 allows an initial larger adjustment and the 3 is used to make a finer one.
问题:(这时应该是对焦的偏心轮已经错位了,这就要整体调整了)
Problem: (At this point, the eccentric wheel for focusing should have been misaligned, which would require an overall adjustment)
When I move the focusing wheel from infinity to about 20 feet, the rangefinder does not move because the lever arm does not move.
我看到,在这种情况下,对焦机构杠杆臂与偏心轴失去了接触。你也遇到过这种情况吗?用偏心轴的平坦区域的末端调整无限远,以确保在近距离对焦时,对焦机构杠杆臂仍然与轴接触,这是不是非常复杂?
I found the problem but I do not know the solution. Maybe you can help me.
I have seen that the my camera, when I move the focusing wheel from infinite to around 20 feet, the rangefinder mirror do not rotate because the lever arm does not move.
I have seen that the eccentric shaft that makes the lever move has a flat area just between infinity and 20 feet or so.
I then tried to change the position of the eccentric axis so that when I focused to infinity, the lever would be right at the point where the flat area of the eccentric axis ends. In this case when I moved the focus wheel from infinity I saw that the rangefinder was moving but….when I turned to minimum focus I reached a point where the lever arm didn’t move again either!
I have seen that in that case, the lever arm loses contact with the eccentric axis. Is this something that has happened to you? Is it very complicated to adjust infinity with the end of the flat area of the eccentric axis to make sure that when focusing close, the lever still has contact with the axis?
解决建议
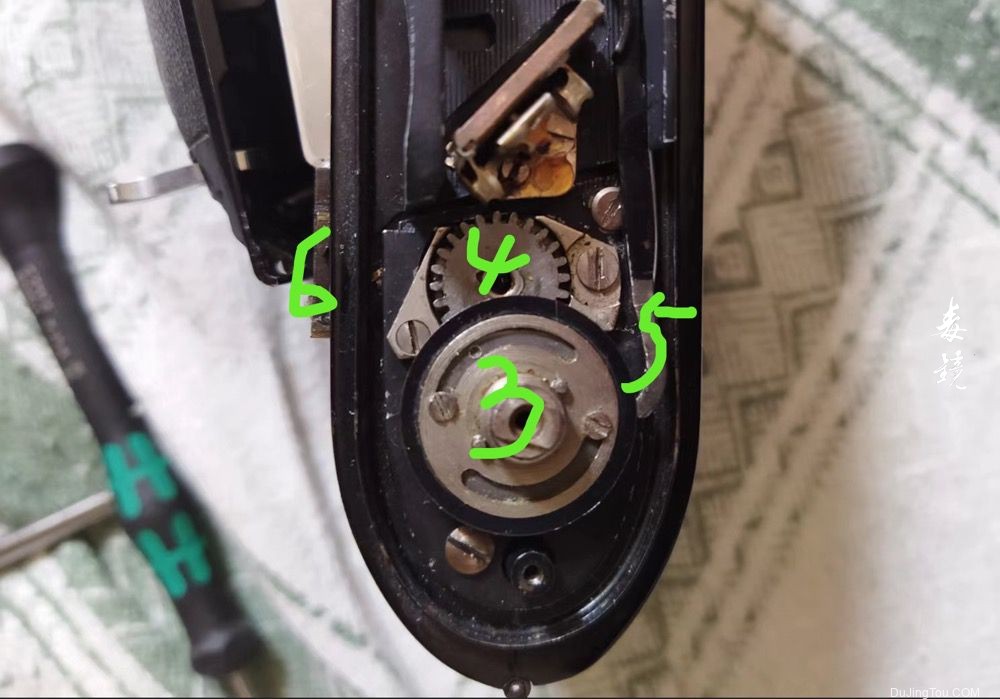
1、对焦转盘固定:这个螺丝用井字扳手固定,任意位置即可

As with my first encounters, this is the most tedious work and testing waiting for you to do.
I will try my best to explain the structure of this position. When you understand the structure of this part, you can continue to test to find the correct position.
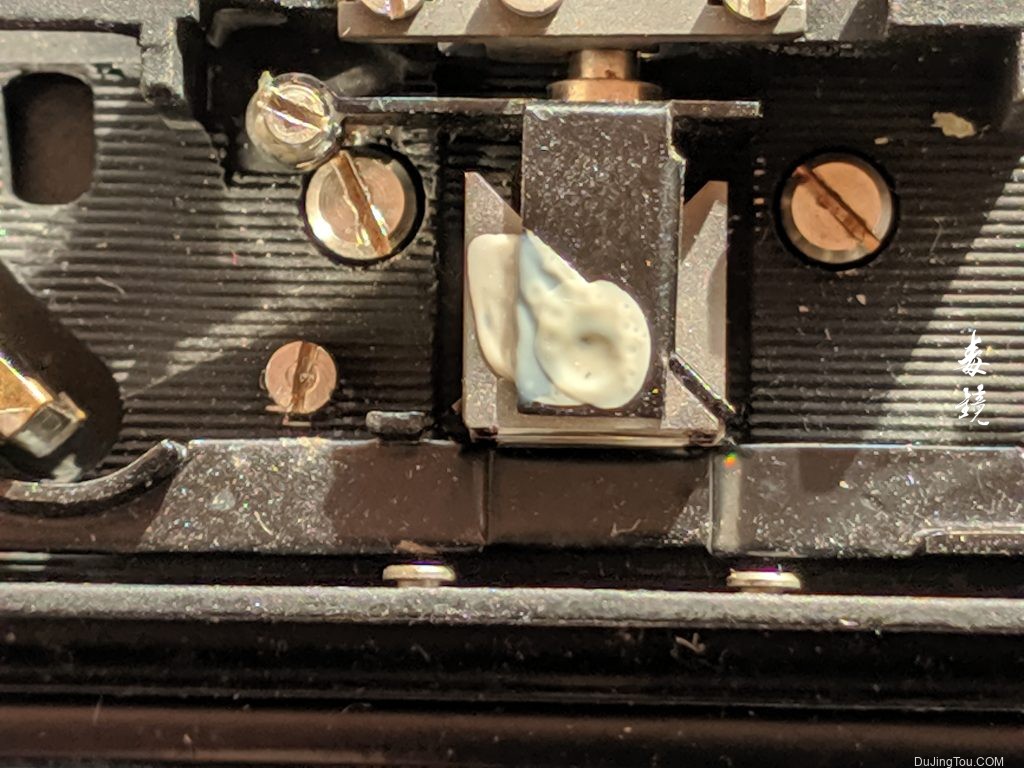
- External: This is the last step of installation
1.Fix the focus wheel: This screw can be removed with a tic-tac-toe wrench and can be fixed at any position
2. Focusing limit mechanism: This position is very important. If it is not fixed correctly, the screw will be disengaged after the closest focusing distance, and then everything will start from scratch. Observe that there are five screw holes below. These five holes can be selected according to the needs, and the limit mechanism can be tightened.
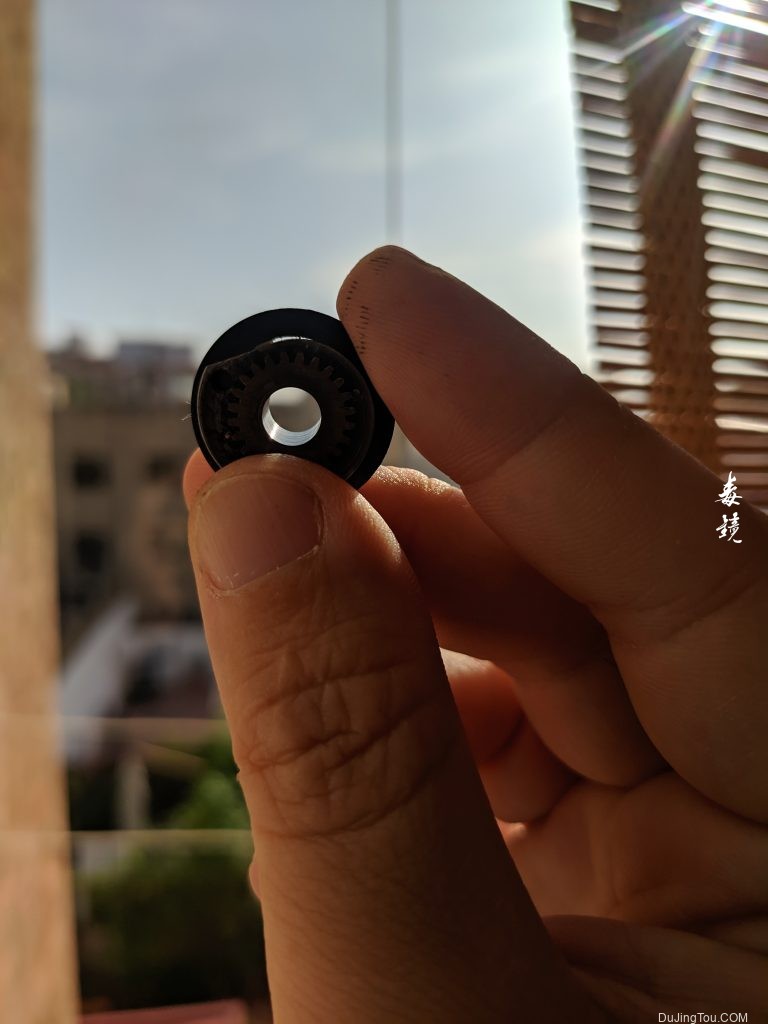
B.Focusing structure: In the following image you can see the problem you encountered occurs here. If you turn the focusing wheel too far to the closest distance, the optical mechanism and the rangefinder, mechanism is disengaged from the rangefinder mechanism..
3. Focusing wheel: The transmission gear responsible for focusing is also responsible for the linkage of the rangefinder mechanism, mainly the position of this thing, which I will discuss in detail later.
4. Transmission gear to the optical mechanism: no need to deal with
5. Rangefinder linkage lever: When it is close to 3, the focus should be close to the infinity position, and when he is far away from 3, the lens is in the closes possible focus. (You can observe carefully and try to find the pattern)
6, If this mechanism is visible as in the picture, the focusing wheel has rotated too far and the lens displacement mechanism is disengaged from the focusing wheel. You can engage it again but all calibration should start again!
This image shows the mechanism when the focusing gear 3 is removed. The lever arm (5) should be at this position near infinity (but not exactly). The focusing lens engaging mechanism (showed in 6) should be all contracted like the picture below.
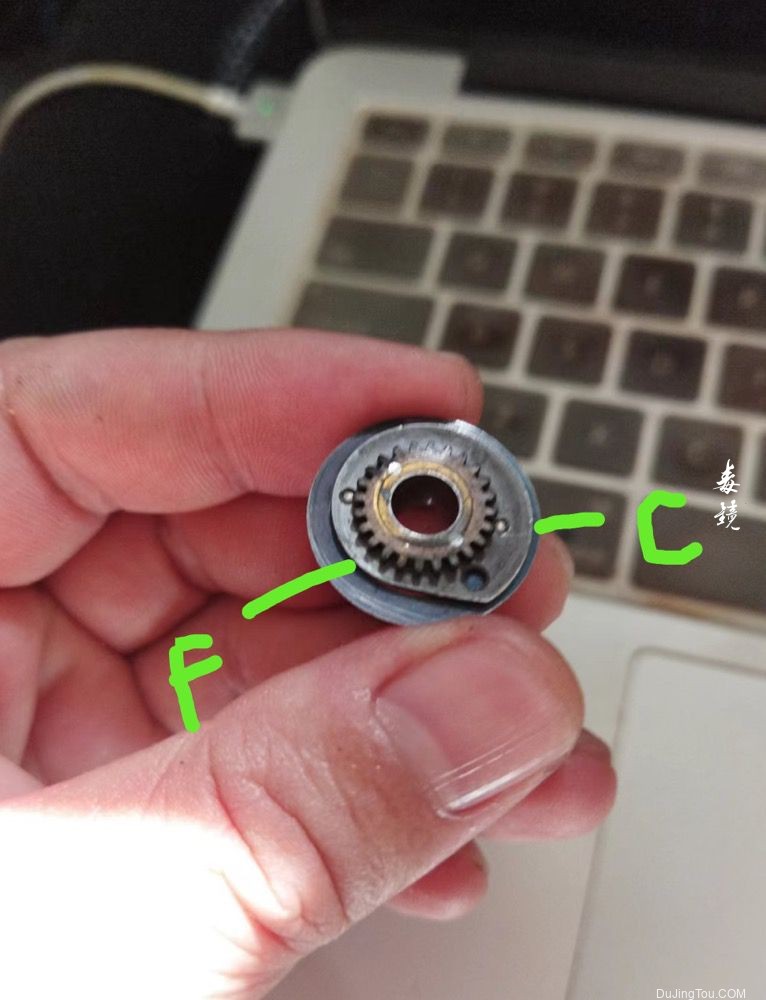
Now I will talk about the 3 focusing wheel structure.
F refers to a position close to infinity, and 5 should be close to this position.
C refers to the position of the most recent focus. At this time, 5 is close to this position, which needs to be found by testing.
Next, I will talk about the complete testing process, which is just a general idea, and the specific details need to be discovered when you test.
1. Rotate the focus wheel 3 and set the position of 6 to the innermost, infinity position.
2. Open the B door of the lens shutter, and use translucent glass to observe whether the infinity position is correct and whether the image is clearly visible. If it is visible, this position is the infinity position. If not, move 6 small steps outward to find a clear position at infinity. then mark
3. At this time, 3 should give the F position to 5, which is the nearest position. fixed.
4. Calibration The rangefinder left and right, up and down looking and object far away (infinite) and using the screws 1 and 2
5. Install, fix 1, then rotate to close to the closest focusing distance, taking care that 6, do not fall off. Then fix 2 in place.
1-5 need to be repeated many times for the real test to be accurate
问题:
I have tried to do as you instructed without success.
But I think I have found the reason.
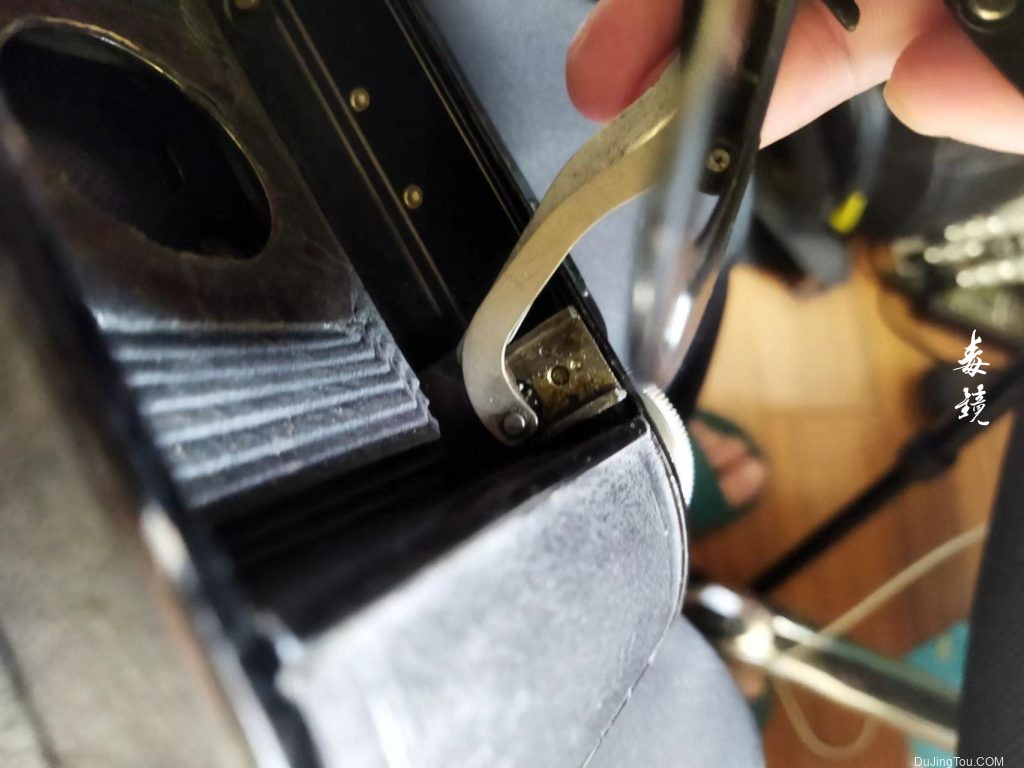
Please watch the attached picture and you can see the lever arm touching the center prism (I put a piece of paper and I am stretching it until it can be easily removed). If you look at where the lever arm is off-centre when it no longer touches the glass, you’ll see that it’s too far from the F point you showed in the detailed manual.
I think the mirror needs to be displaced to give the lever arm more room to move, what do you think? If so, do you know which screw moves the center glass?
I also saw that the eccentric allows some light to pass through (see attached photo). I don’t know if this is normal (it can’t be adjusted, I’m afraid).
I’ve also attached a photo of the full mechanism, if you see any difference from yours (at first I suspected the lever arm was deformed, but I don’t think so since I’ve seen this problem with the central glass position and the interference with the lever arm
Thanks again. I think I’m close to solving this problem.
这里毒镜漏看了邮件所以没有回复,这里Alfonso 通过不断的测试已经了解了整个对焦系统的原理和结构。
Hi. I haven’t contacted you until now because I’ve been busy trying to adjust the camera.
I finally found the problem! The central prism was displaced and was contacting the lever arm. It was just a matter of pushing the prism to the right position with a screwdriver and I was able to calibrate the rangefinder.
I have done some tests but I still haven’t got correct results.
I have tested indoors at f4 and I can see that the focus is not good at all.
Maybe it needs a little more adjustment. I have made a setup with a digital camera and a 400 mm lens (270 full frame on an APS-C) focusing to infinity. The focus didn’t look bad but I think there is room for improvement.
I have also supplemented the pressure plate with foam to ensure that there is enough pressure on the negative and that it is as flat as possible.
I have a question to ask you, on your Voigtlander Bessa RF cameras, are you able to focus correctly at f3.5 – f4, or at those apertures, is the depth of field so narrow that any rangefinder/focal plane error makes the picture out of focus? Your cameras are enough well calibrated to shoot at f3.5?
这里Alfonso 已经解决了大部分问题,但是发现对焦清晰度不够,通过对比样片我们发现是黄斑校准还没到位,所以根据Alfonso用的工具和方法给出了进一步的建议。
Great to hear your new progress.
Regarding the deformation of the middle lens, I don’t think it is deformed. I should have encountered this problem. In fact, it is just adjusting the screws to calibrate the viewfinder and the position of the split image screen. Those screws are not very easy to adjust.
The gear piece is not deformed, in fact, this is what I said needs to be adjusted,
Rotate the gear when the gear reaches the infinity position, whether the corresponding transmission to the split image screen is also coincident with the infinity focus (you need to see with your eyes, you can use a tripod to fix it), do this first, and then check whether the split image screen is facing upwards. If the downward direction does not coincide, adjust the screw again, because after the position of the gear finds the correct position, there is no need to adjust it again, just fix it.
I think you are almost done successfully.
Regarding the Bressa RF and bressa II cameras when the distance is too close to the maximum aperture, I have a hard time getting a clear picture but I think your problem is caused by the fact that the focusing mechanism is not fully adjusted in place, and at present your camera can basically meet the requirements of normal shooting.
PS: Occasionally, uncompressed film can also cause blurry shots, I’ve encountered that twice.
The attachment a photos taken probably at the maximum possible aperture because it was taken in the evening(bessa rf helomar) showas that a picture can be taken with no blur.
结果:最终结果终于维修完成
我花了几个月的时间,完成了奥伊格朗德测距仪的校准工作。
It took me a few months to calibrate the Vöigtlander camera.
I wanted to finish the calibration quickly before going on vacation last July, but due to the rush, I made some mistakes. First, I took a building 100 feet away as a reference (close to infinity but not enought, I think), so the infinity reference for the rangefinder calibration was not completely correct.
On the other hand, to project the image, I used a translucent sheet of paper, but I don’t think It was perfectly flat. Another mistake.
I tried it again after the summer holidays and I created a system like the one shown here to ensure focus and not just my eyes.
I glued the translucent paper to a flat transparent glass to ensure it is completely flat.
Lastly, a final adjustments were made after shooting a last test roll. The results are incredible.
I now have another camera for my collection and am excited about the opportunities this camera opens up for landscape and portrait photography.
Thank you very much!
总结
整个维修过程是漫长的,但是结果很让人高兴,其实在过程中,由于无法直接看到调整过程,所以毒镜这边的建议也并不是很精确的,甚至有些都是笼统的,所以只能不断的把过程图片标精细,这样沟通的时候能够更清楚一些。
非常感谢Alfonso的支持与信任,是他认真的修复了BESSA RF相机并帮助我认真的完成了本篇文章的撰写,校对,以及英文的翻译工作,希望Alfonso可以拍出更多自己喜欢的照片。
Summarize
The whole maintenance process is long, but the result is very pleasing. In fact, during the process, because the adjustment process cannot be directly seen, the suggestions on the poison mirror are not very precise, and even some are general, so only I can constantly mark the process pictures finely, so that the communication can be clearer.
I am very grateful to Alfonso for his support and trust. He seriously repaired the BESSA RF camera and helped me to complete the writing, proofreading, and English translation of this article. I hope Alfonso can take more photos that he like.


Thank you very much for your help. Without your detailed rapair indications it will be very difficult to find the problem of my camera.
¡Muchas gracia!¡Moltes gràcies!
也感谢Alfonso一直以来的帮助,在你严谨的实践之后,才能给大家带来这么有用的经验。
请问对焦窗看中央棱镜倾斜错位该如何调整
这种也是要打开上盖之后调整,也是需要反复校准。